


Importing Opportunity Products (OpportunityLineItem)
After reading this article, you’ll be able to:
- Identify the advantages of using Impowr to import Opportunity Products in Salesforce.
- Create an object and field mapping in Impowr for Opportunity Products.
- Add and configure the File Import component to an Opportunity Record Page.
- Import Opportunity Products to an Opportunity Record.

Why use Impowr to import Opportunity Products?
We here at ProvenWorks understand that Products added to an Opportunity are often managed in external systems, so importing this data into Salesforce is crucial. But with our 10 years+ experience of dealing with importing data into Salesforce, we also understand that importing can come with its own headaches… That’s where Impowr comes in.
The File Import component, part of Impowr, can drastically optimise importing Opportunity Products to Opportunities within your Salesforce organisation by allowing you (and your users) to upload the file on an Opportunity record page itself. Impowr then does all the hard work for you by inserting all the Products from your file directly to the viewed Opportunity – there’s no need to map fields every time, or source record IDs. This not only saves you time, it also prevents user error.
It requires a one-time setup that then allows users to rinse and repeat, time and time again, saving on average over two minutes for every file imported.
Like the sound of the File Import component? Get in contact with us and we’d love to show you around Impowr. If you’ve already got Impowr, keep reading!

Create an object and field mapping
The following steps assume that you have active Products with Price Book Entries. Also, the Opportunities we will use in this example will already have a Price Book selected.
Before the component can be placed onto any Lightning page, it requires a pre-defined mapping which contains reference to the object and fields that the user will be importing into. Using Impowr, this process is made effortless.
As we’ll be importing Opportunity Line Items, let’s take a look at this object in more detail. This will help us create a mapping.
The object has four mandatory fields so these must be configured in our mapping. Here’s a handy description of what data should be fed into these fields:
Opportunity– the Opportunity record that the product will be associated with. This will be added as a Constant Value in the mapping stage.Product– the Product that will be added. This can be an ID, or Product Name if they are unique in your org.Quantity– the quantity of the Product being added to the Opportunity.Sales Price– the price of the Product, per item.
Note: Total Price on the Opportunity Line Item record is a calculation of Quantity x Sales Price and is processed automatically during insert.
Now we know what fields are required, let’s create a template file which we will use to create a mapping. To create a mapping, the file must contain field names in row 1 and at least one row of import data in row 2.
Create a template file
- Create a new spreadsheet file: Populate row 1 with the mandatory fields: Product, Quantity, and Sales Price.
- Note: Because the Opportunity ID will be added as a Constant Value during the mapping stage, it does not need to be included in your import file.
- In the first cell underneath Product, add either the
Product NameorID. This product must be Active and have a Price Book associated with it. - In the first cell underneath Quantity,
enter a value. - In the first cell underneath Sales Price,
enter a value. Savethe file to your computer.

Generate a mapping
Now that we have a template file, we need to configure the file within Impowr and generate a mapping.
- From the App Launcher, find and select Impowr.
- Upload the created template file by using either the drag & drop functionality or click to upload.
- Once the file has uploaded, select the Import to Salesforce button.
- In the Object Selection master picklist, choose Opportunity Product (OpportunityLineItem).
- Click Continue.
- Select Insert and Continue to the mapping page.
The field mapping page now allows us to choose the destination fields on the Opportunity Line Item object. Selecting the edit icon on each row under the Object fields section will open the field finder. Each field in the field finder will be structured in the following way:
Field Name | External ID Field (if applicable) | Object
- For Product, map
Product ID (ProductId2) | Product Name (Name) | OpportunityLineItem. - For Quantity, map
Quantity (Quantity) | OpportunityLineItem. - For Sales Price, map
Sales Price (UnitPrice) | OpportunityLineItem. - For Opportunity:
- Click Add Constant.
- Add {!Record.Id} as the Constant Value.
- Map
Opportunity ID (OpportunityId) | Opportunity ID (Id) | OpportunityLineItem.
- Now that the mapping is correctly configured, use the Save Mapping button and name the mapping.
Note: If you are using a Product ID to reference products in your import, use Product ID (ProductId2) | Product ID (Id) | OpportunityLineItem instead.

With the mapping saved, we must now set up the mapping template for use with the File Import component. Use the Preferences button at the top of the page and scroll down to the Mapping List section to locate the mapping you saved.
Click View JSON, and copy the JSON text.
Now open the Mapping Template tab, click New, name the template and paste the JSON text into Mapping (JSON) and save the mapping template.


Add the File Import component to your page
With a mapping template now created, we want to place the File Import component onto the Opportunity Record Page so that our users can import their products whilst looking at the Opportunity.
In Salesforce, navigate to Setup and select Lightning App Builder from the setup menu.

If you already have a custom Lightning Page for your Opportunity, select Edit next to it. Alternatively, select New and follow the steps through to create a new record page. This org already has one created so we will edit Opportunity Record Page.

From the Components menu on the left of the screen, search File Import (Impowr) and drag it onto your layout. You will initially see that ‘Mapping template not set.’ but this will change with later configuration
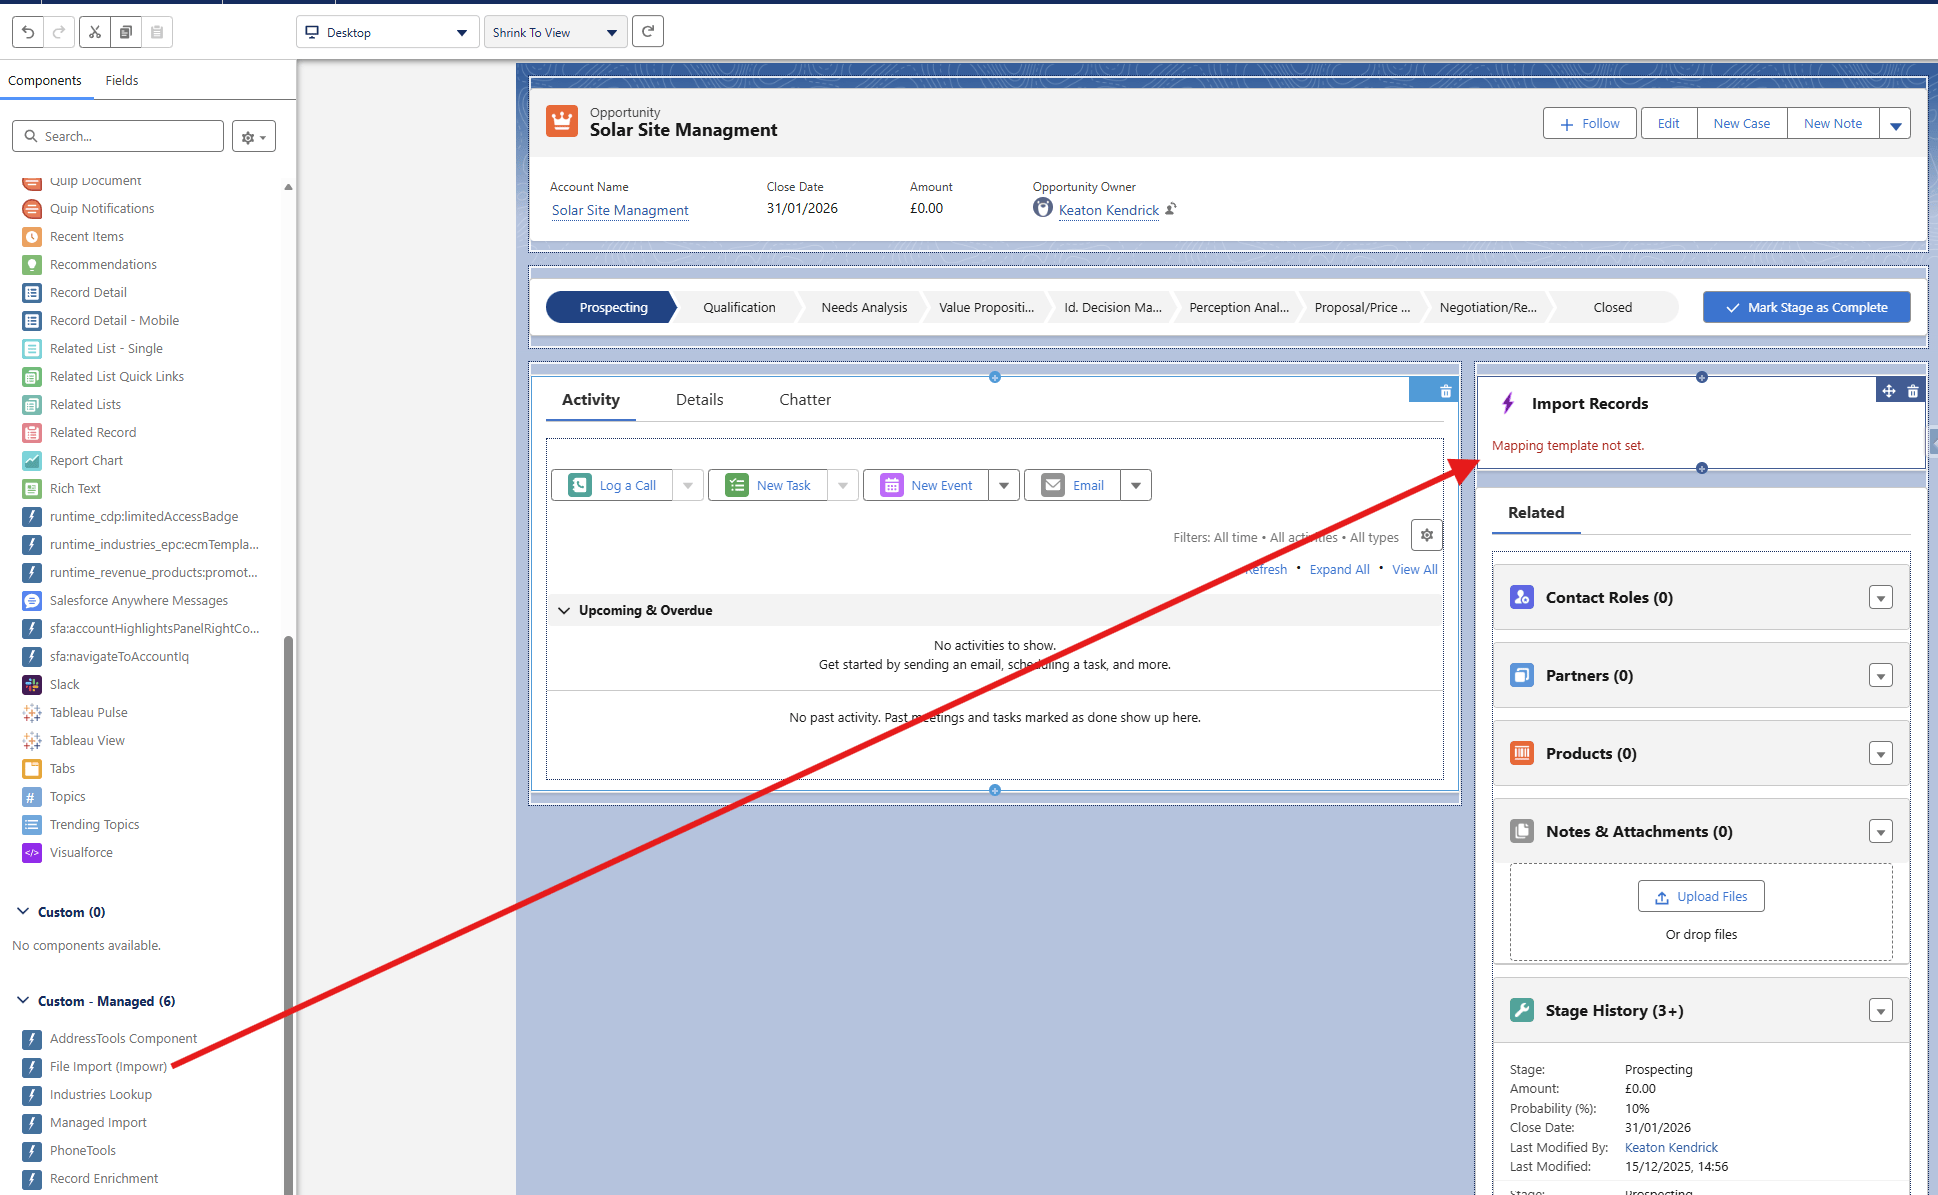
Once the component has been placed, click on it. The design parameters menu will appear on the right of the screen. In the Mapping Template field, select the mapping template from the previous section.
You can edit the title text to meet your requirements.

Press Save and Activate to confirm your changes to the page layout and now it’s ready go!

Testing out the File Import component
If you’re this far, well done! We’ll now need to test the component to make sure it works as expected.
Go to an Opportunity record where you want to import the Opportunity Line Items. If you don’t see the component, you may be required to clear your browser’s cache before it becomes visible.
Use the Upload File button or drag the file for importing into the component.
Impowr will now go to work processing the file and extracting the data to insert it into your organisation. You can follow the progress via the progress bar on the component.

Once the path hits Finished, you should see the summary in the component such as Inserted 5 Opportunity Product.
To review the successful rows, use the drop down action and select Download success (Inserts).
If errors are generated during the import, use the drop down action to reveal a Download error file option. This will produce a CSV highlighting the failed rows. A new column will be provided stating the Salesforce exception which resulted in the failed attempt. Once these errors have been rectified in your Salesforce environment, you can try again.
For the final check, review Products in the Related section on the Opportunity. You will see the inserted products and sale price of any Opportunity Line Item file that was imported.

And that’s it! You can use the component over and over on each of your Opportunities without any need to remap any fields.
Got questions? Chat to us!
Do you want to learn more about how Impowr could be a great addition to your Salesforce org? We’d love to chat! Use the scheduler to book a free call with our team and start your journey to faster, simpler imports.
Can’t find a time that works for you or would rather email first? Fill out our contact form and we’ll get back to you as soon as we can.
